


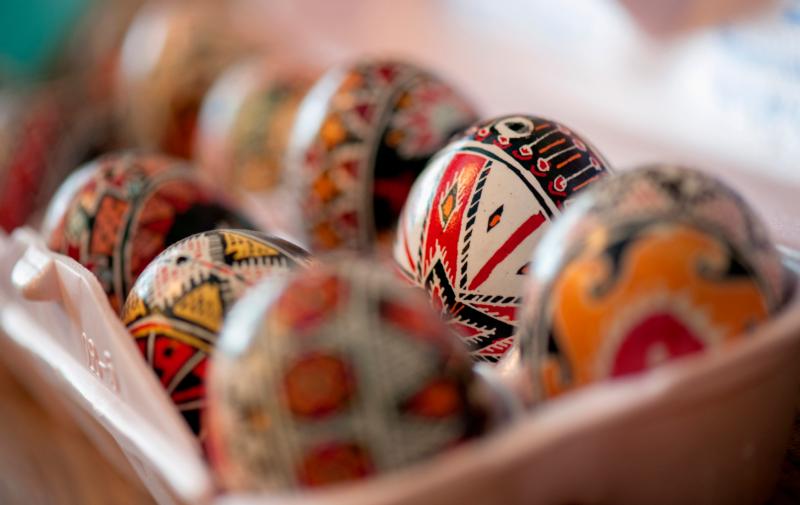
Easter eggs painted by David Bryniarski, a parishioner of St. Stanislaus Kostka Church in Rochester, N.Y., are pictured in this 2016 photo. Pisanki, the art of decorating Easter eggs, is practiced in Poland and in several other Eastern European countries. (CNS photo/Mike Crupi, Catholic Courier)
Pisanki, the art of decorating Easter eggs, is practiced in Poland and in several other Eastern European countries. In Polish, the verb “pisac” means “to write,” hence pisanki can be loosely translated as “writing on eggs.”
There are several distinct pisanki techniques associated with particular regions of Poland. Skrobanki are traditionally found in Silesia. Eggs are dyed a single color, then the design is created by scratching the egg with a knife or other sharp object. Malowanki, from central and southern Poland, are designs painted on the egg using a brush.
Batykowane, found in eastern Poland, is probably the best known of the Polish techniques; it involves drawing the design with hot wax. The egg is placed in dye, coloring the egg except where it is covered by the wax. Designs can be enhanced by using multiple applications and colors. There are other techniques, but these are the most widespread.
[hotblock]
For the most part, pisanki is associated with the batykowane technique, and I learned this method growing up. My grandparents emigrated from Poland in the early 1900s. When we were children in Massachusetts, my mother taught my sister and I how to decorate eggs, as she was taught by her mother, who came to the United States from Rymanow, a village near Rzesow.
At that time we applied the design using hot paraffin applied with a matchstick. We then ate the eggs on Easter morning, so the designs were quite simple.
I continue to do pisanki today, although after living in western Pennsylvania and learning from friends there, I use beeswax applied with a specialized stylus. This creates a more detailed, elaborate design. These eggs are not eaten — it takes two to three hours to decorate a single egg! — but sent to friends and family in lieu of Easter cards.
Instructions
Blowing Eggs:
If the insides of an egg are not removed, it will eventually spoil.
— Rinse the outside of the egg.
— Using a sharp nail or ice pick, peck a small hole in each end of the egg. Start with a very small hole, then enlarge it. Peck away slowly so the egg will not crack.
— Using a toothpick, break the yolk inside the egg.
— Blow the inside of the egg into a bowl — good for scrambled eggs or an omelet.
— Rinse the inside of the hollow shell. Blow water inside, then blow the water out. Rinse the outside of the egg, pat dry.
— Let stand for a day to fully dry inside.
[tower]
Setting up the work station:
— Use food coloring or specialized dyes specific to pisanki. When using regular food coloring, refer to the directions provided.
If using the specialized dyes, prepare per instructions on the package. Usually 1 tablespoon vinegar, 3/4 cup boiling water and the contents of the dye packet for each color. Let cool to room temperature. Most of these colors are inedible and cannot be used on hard boiled eggs to be eaten.
— The design is made on the egg by applying melted beeswax with the pisanki stylus. The wax is melted by placing a pea-sized piece of wax into the stylus, then placing the stylus in the flame of a candle.
— Use a candle holder or saucer. If using a saucer, melt a few drops of candle wax in the center of a saucer to hold the candle.
— Keep a supply of paper towels and newspapers on hand to contain any dye splash.
— Have spoons ready for each dye color to transfer the egg in and out of the dye and to keep the egg from floating when being colored.
Applying the design and coloring the egg:
The design is created with melted wax, applied with the pisanki stylus. Once the wax has been applied, the area covered with the wax will remain the color under the wax and cannot be colored further. If the wax is placed on a light color, that color will remain when the egg is placed in a darker dye.
I generally work with three colored dyes –yellow, red, black — which, including the white of the uncolored egg provide a total of four colors.
Before decorating, select a design, then place a pea-sized piece of wax in the stylus and hold in the candle flame until melted. As you continue to work, add more wax as the stylus empties.
— Carefully and thoroughly seal the holes at either end of the egg with wax.
— Select a design and apply the first stage of the design on the white egg.
— Once the white part of the design is complete, place the egg in the yellow dye and hold in place until the desired shade is reached, about 3 to 5 minutes.
— Dry the egg with a paper towel. Apply the second stage of the design on the now yellow egg.
— Place the egg in the red dye until the desired shade is reached for 5 to 15 minutes.
— Dry the egg. Apply the third stage of the design on the red egg.
— Place the egg in the black dye and hold in place for 5 to 15 minutes.
— Dry the egg.
— Once the back dye has dried, remove the beeswax. Gently hold the egg above the candle flame until the wax melts on one part of the egg. Wipe clean with a paper towel. Continue until all the wax has been removed.
— Optional: Using an aerosol spray can, apply a light coat of shellac or varnish to the egg. Hold the egg with a pipe cleaner or piece of wire through the end holes. Let dry and repeat to allow 2 to 3 coats.
Although designs may be intricate and elaborate, plain and simple patterns can be just as effective. Several basic designs can be found online and in literature on Polish folk art, and supplies can be purchased online.
***
Bryniarski is a collector of pisanki and has taught pisanki techniques in the Rochester, New York, area for the past 12 years. View more photos of the process here.
PREVIOUS: A recipe for Easter placek, the traditional Polish bread
NEXT: We can’t keep from singing alleluia forever
Share this story